Thursday, September 27, 2012

The Bobble Ball

I went to a local fabric shop a few weeks ago and saw the cutest ball. They were selling the pattern for $10 though! I looked at it carefully and thought, "I could make that." It is more or less a beach ball with appendages sticking out all over it. For lack of a better name I am going to call it The Bobble Ball.


To get started you need to make 2 templates: one for the ball and one for the bobble. For the beach ball template I did a rough drawing on an 8.5'' by 11'' piece of paper and cut it out. Then I folded it in half twice and trimmed the edges so they were all even. This will make your template symmetrical. I cut out 6 of these using 2 different fabrics (3 of each).

4'' wide, 11'' tall
For the bobble template I drew a mushroom shape and cut it out. Then I folded it in half and trimmed the edges to make it symmetrical. I cut out 18 of these to make a total of 9 bobbles. I started by taking two of the bobbles and placing them right sides together and making a seam all the way around, leaving it open at the base. Then I turned it right side out and stuffed it with Poly-Fil. 

3.5" wide (mushroom), 1.75" wide (base),  5" tall
Once all of the bobbles were sewn and stuffed I started sewing together the pieces of the ball. I didn't take a lot of detailed pictures of this but hopefully the pictures I did take along with some instructions will be helpful. Take two of the ball pieces (one of each fabric) and place them right sides together. Then take one of your bobbles and place it in between the two pieces with the end of it sticking out (as shown in the picture below. Sew a seam along that edge of the two ball pieces.


Then take another piece of the ball and place it right sides together with one of the ball pieces that you just sewed together (make sure you alternate between the two different fabrics). Take two of your bobbles and place them in between the pieces of fabric and sew a seam.


Continue to do this until you have sewn all of the pieces together and just have one more seam to close up the ball. I alternated doing one bobble and then two bobbles between each of the ball pieces. When you get to the last seam, pin your bobbles in place and sew a seam but leave an opening big enough to turn it right side out and stuff it. 


I made mine a little bit too small, so turning it right side out and stuffing it was a little more difficult than it should have been.


Stuff your ball as much or as little as you want and then sew up the opening with a needle and thread.


Last but not least, stand back and admire your beautiful work. And let someone else enjoy it too!

I think she approves!


After I had already made this I had some pretty brilliant (if I do say so myself) ideas for some variations you could do with this. You could use fabrics with different textures. I had some of that really soft and cuddly fabric with the dots on it (what's it called?) that I could have used for the bobbles. I also think that it would be fun to put some little squeakers, rattles, and bells in the ends of the bobbles. Then it becomes more of a discovery toy and your child can have fun with all of the different sounds that it makes. Let me know if you have any ideas on other variations. I would to hear from you!

Tuesday, September 18, 2012

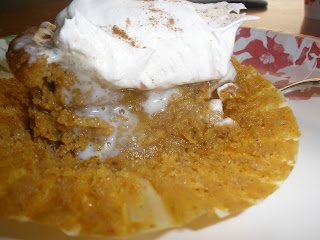
Pumpkin Pie Cupcakes

 
With Fall knocking on my door, I have been very eager to start all of my Fall baking . . . lots of pumpkin and apples.


This right here is one of the reasons that Fall is the BEST season of the year. I love pumpkin everything! Cookies, muffins, pie. You name it; I love it!


Another great thing about Fall is that I can finally try out all of the pumpkin recipes that I have come across on Pinterest. I found a recipe for pumpkin cupcakes from Baking Bites and thought I would give it a try to start of the Fall baking season. Her recipes yields 12 cupcakes and uses a 15 oz. can of pumpkin puree. I only had 29 oz. cans so I doubled the recipe. Here are the doubled measurements.

1 and 1/3 cup all purpose flour
1/2 tsp baking powder
1/2 tsp baking soda
1/2 tsp salt
4 tsp pumpkin pie spice
1 29-oz can pumpkin puree
1 cup sugar
1/2 cup brown sugar
4 large eggs
2 tsp vanilla extract
1 and 1/2 cup half and half (or evaporated milk)


I didn't have large eggs so I used 5 medium instead of the 4 large that the recipe called for.

 I also didn't have pumpkin pie spice but luckily she had a link to how to make it. The measurements she gave would have made close to a 1/2 cup of pumpkin pie spice and I definitely didn't want that much. So after doing some math I ended up using the following for DOUBLING the original recipe.

2 and 1/2 teaspoons ground cinnamon
1 and 1/4 teaspoons ground ginger
1/2 teaspoon ground cloves

I didn't have any nutmeg on hand so I just left that out (it wasn't that much anyways). This is just a bit more than the 2 teaspoons of pumpkin pie spice that the recipe called for but I don't think its that big of a deal.

REMEMBER . . . this is for a doubled recipe. Just cut these measurements in half if you are making a single recipe. I know it is pretty obvious but I almost always mess up when I am halving or doubling a recipe.

Preheat oven to 350 degrees.

Mix the flour, baking powder, baking soda, salt, and pumpkin pie spice in a medium bowl. In a large bowl mix the pumpkin puree, sugar, brown sugar, eggs, vanilla, and half & half until smooth. Add in the dry ingredients to the pumpkin mixture and stir until all of the flour has been mixed in.

Put paper cupcakes liner in a muffin pan (I would not recommend making these without liners) and fill them with 1/3 cup of the mixture (almost all completely full).

Pop them in the oven for 20 minutes. Pull them out to let them cool (center will sink down) and enjoy! They were pretty darn tasty while they were still warm. The recipe says they are best when served chilled so I can't wait to see if they are even better then.


Monday, September 17, 2012

Fall Burlap Wreath

I saw some gorgeous burlap bubble wreaths on Pinterest and decided to give it a try. I found the tutorial at Today's Fabulous Finds. This tutorial has good pictures and directions. Here is what I made...


I used a styrofoam wreath form and wrapped it using 2 long strips of burlap. I secured the burlap with pins. This is the only thing that I really did differently from the tutorial. I did not want any of the white styrofoam to show through the burlap.


I also cut my burlap into 4 inch squares and then folded it in half diagonally and then brought the other two corners down. Then I pinned it to the styrofoam and used my finger the fill it out and make it more of a bubble. I also attached a brown burlap bow and some ribbon on the back for hanging. If you make one I would love to see your pictures!


Check out our other burlap wreaths for Fall, Halloween, and Christmas in our shop!

Tuesday, September 11, 2012

Button Earrings

I remember the first time I saw fabric covered button earrings a few years ago. I thought they were SO cute! I also wondered how to make them. It seemed like it might be difficult. Little did I know, they are quite simple to make. Here is what you will need:

  • fabric of your choice (small patterns work best because the surface area of the button is small)
  • button kit (this includes the button heads and backs, mold and pusher, and a template for cutting your fabric; you can usually find these at a craft store such as Jo-Ann's)
  • earring posts and backs
  • scissors
  • needle nose pliers (to remove button shank)
  • hot glue gun


The button kit comes with instructions on how to put the button together but I have also included them here.
Trace the circle onto your fabric and cut.
Place fabric, centered, on top of mold.
Place button head, centered, on top of fabric.

Use the pusher the push the button head down into the mold.

You will need to use your finger to push the head down the rest of the way.

Push the excess fabric into the back of the button head.

Place the button back on top.

Use the pusher to push the back into the head of the button.
Make sure you push down as straight as possible so it goes in evenly. If one side is down farther than another you can use the needle nose pliers to push the higher side down farther.

To remove the shank, use your needle nose pliers the squeeze the bottom of the shank together.

Then, grab the shank horizontally and pull it out. Sometimes it comes right out. Most of the time, though, you have to wiggle it around a little bit and pull to get it out. Don't pull too hard, though. Sometimes that back of the button will pop right out.


Then you just need to put a dab of hot glue on the back and put the post on. 

Easy, right?

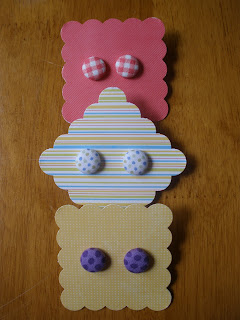
These also make great gifts. When I am giving them away I like to put them on a piece of card stock to dress them up a little bit. I use a 2 1/4 in scalloped square punch. It is a perfect size for these earrings.


Ta-da! Beautiful button earrings to give away to all of your friends! Or just keep for yourself :)


Tuesday, September 4, 2012

Welcome!

Welcome to The Slanted Barn! I have created this blog to document all of my crafting and DIY attempts and adventures. I have a love for all things DIY and crafty from sewing to paper crafting. I want to share some tried and tested tutorials with you, introduce you to new ones that I have found, and share some of my own. I hope you enjoy! Like us on Facebook and check out the Etsy store.